|
||||||||
Architecture
This chapter presents the design and architecture of numEclipse. It is intended for people interested in using the interpreter as a research vehicle and they will be writing their own execution engine. Reading this chapter, will also be beneficial for programmers writing a toolbox. An end-user can conveniently skip. Like any interpreter the design of this application can be divided into two major pieces. The front-end which deals with the scanning and parsing of the input program and back-end which actually executes the code. This chapter is also organized along the same lines. Here, we also show how to develop and deploy a custom execution engine. A number of open source tools and mathematical libraries are used in the development of numEclipse. We will also talk about their role and interfaces with the application.
6.1 Front-endAn interpreter front-end performs two tasks. It scans the input to identify the tokens and it parses the input into an AST (Abstract Syntax Tree). Traditionally, compiler / interpreter developers have used lex and yacc like tools to generate the lexer and parser programs from the language specification, i.e., grammar. We used the similar approach and rather than writing the lexer and parser from the scratch, we used SableCC. This amazing tool is based on a sound object-oriented framework. Given a grammar, it generates tree-walker classes based on an extended visitor design pattern. The interpreter is built by implementing the actions on the AST nodes generated by SableCC. In the following, we present a code snippet showing how the interpreter is actually invoked by the application.
Reader strReader = new StringReader(input);
Lexer lexer = new Lexer(new PushbackReader(new
BufferedReader(strReader))); Once the grammar is solidified, generation of Lexer and Parser classes using SableCC is just a click of a button. Most of the effort in developing this application involved the "interpreter" object. This object is an instance of a class "Interpreter", which extends "DepthFirstAdapter" class and it is generated by SableCC. The adapter is the AST tree walker mentioned earlier.
For further information on SableCC refer to the website http://www.SableCC.org.
6.2 Back-endSo what constitutes the back-end? Back-end is where the action happens. The back-end starts from the class which extends (i.e., Interpreter) "DepthFirstAdapter" class. This tree-walker class has the action code for each node encountered in the AST during parsing of the input program. Here is the list of actions that happen in this class.
The m-script, as mention in earlier chapters, does not require you to declare a variable. You can just start working with a variable and the interpreter will figure out the value and type of the variable. This poses some implementation challenges but provides a lot of flexibility to the end-user. In the chapter on programming, we referred to interface class LinearAlgebra (refer of appendix C). It provides methods to create different type of variables. The implementation of the interface classes given in Appendix C constitute the execution engine. These classes not only provide the methods to create the different variables but also provide the basic arithmetic operation to evaluate complex expressions. Good understanding of the functions of these classes is essential in order to implement an alternative execution engine. The symbol table is implemented as a hash table. In fact it contains three hash tables for ordinary symbols, global symbols and constants. Symbol is another object which is used to wrap any variable before it is stored into the symbol table. Each instance of the interpreter window gets its own symbol table, so you can only see the symbols in the memory view which are tied to the active interpreter. The symbol table extends Observable class so that the memory view could register as an Observer and show the changes as they happen. The Symbol class implements the Serializable interface, so that the variables could be easily saved and retrieved from a file. This is how we save a session.
Expression evaluation depends entirely on the basic arithmetic operations on different data types supported by numEclipse. As mentioned earlier, these operations are defined within the implementation classes which form the execution engine (refer to appendix C). Statements are discussed previously in programming chapter. They are very similar to any other programming languages like C or Fortran. The correct execution of these statements is the responsibility of the Interpreter class. This functionality is fixed and cannot be modified for obvious reasons.
numEclipse has a number of built-in functions and it offers the ability to integrate user-defined functions. On the start-up, the application loads all the m-script and java functions into a library. All functions, built-in or user-defined, are loaded through a common mechanism using Java Reflection APIs. The library manager also keeps track of the dll files added by the user as described in section 4.3. Since, all the methods are pre-loaded in a hash table, the cost of calling the functions is not so high. The library manager maintains a precedence rule for the function calls. It looks up a function in the following order.
At the moment, this order is fixed but in future we might allow the user to change this precedence rule through preferences. This completes an overview of the interpreter back-end for more insight one needs to go over the source code.
6.3 User InterfaceThe very first user interface of numEclipse never saw the day light. It was built on Java/Swing. It was quickly realized that it does not really serves the objectives of this project. The intention behind numEclipse is not just an interpreter but rather a comprehensive development environment for scientific computing. However, MATLAB or GNU Octave do provide the possibility to add functions in other programming languages but they do not provide any integration with the development tools as such. We decided to re-write numEclipse as an eclipse plug-in and this approach opened up a whole new world of opportunities for us. In previous chapters, we showed how to write java and C/C++ functions within eclipse and how to quickly test and deploy them with numEclipse. This seamless integration would not have been possible without the eclipse platform.
We decided to following software engineering approach to scientific application development. So, we introduced the notion of a numEclipse project. This gives a project oriented and role based development of scientific application. We created a new perspective for the project development. We also added a wizard to create a new project. The perspective contains three new components, i.e., interpreter window (editor), memory view and history view. The interpreter window is basically an editor in eclipse's terms. We do not know of any other interpreter implementation within eclipse so we developed the interpreter (editor) from the scratch. The design of this interpreter is still in development and there are a lot of opportunities for improvement. The memory and history views were rather easy to develop. They use the observer - observable design pattern to update their corresponding information. At the moment the interpreter window is very much hocked to the actual interpreter and we are trying to come up with a better design to introduce separation of concerns. This might set a precedence for future interpreter plug-ins for eclipse.
6.4 GNUPlot InterfaceHere we repeat the prologue of previous chapter along with some insight into the interface between numEclipse and GNUPlot. Our initial intent was to write Java2D / Draw2D based plotting APIs. But we quickly realized that not only this is an enormous task itself but also there is no point in reinventing the wheel. There are already a number of open source projects providing excellent APIs for plotting. Our objective was to choose something similar to MATLAB. We started looking at PLPlot first, it is a set of plotting functions written in C. This project also provides java binding to the C functions. Unfortunately, this project is more geared towards linux / UNIX users. We first time compiled the JNI enabled dll on WindowsXP and we came across a lot of problems. PLPlot functions have their own windows management, once a graph is plotted by a java program through binding, it has no control over the plot window. Also we discovered that you could only have one plot at a time which is not acceptable for our purpose. Finally, we decided to take the approach of octave and provided an interface to gnuplot. It is an excellent tool for scientific plotting. It has been developed over a long period of time. We are using version 4.0 and it is very mature and stable. We provide this interface to gnuplot as a built-in toolbox. We are hoping that some users will try to write their own toolbox to other visualization APIs or applications.
Gnuplot is an application rather than a set of APIs. It provides a command line user interface. This posed another challenge for integration. But fortunately, gnuplot also accepts the user commands through a named pipe. Now, you would understand why we need to define the path to the gnuplot execution file within the numEclipse preference. In the following, we show the code snippet used to invoke gnuplot and create a link.
Process p = Runtime.getRuntime().exec(gnuplot); //invoke gnuplot PrintStream out = new PrintStream(p.getOutputStream()); //create a link
Once a link is established, to send a command to gnuplot we use the following.
String command = ..... out.println(command); out.flush();
So you see the integration with gnuplot is very straightforward. Most of effort involved writing methods which translated numEclipse commands into gnuplot commands. On top of that, we had to store the data and states in between the commands. To store the temporary plotting data, we create temporary files in user area allocated by the operating system. These files are short lived and scratched at the end of session. In order to get more information, one needs to walk through the source code, i.e., org.jmatlab.toolbox.Plot.
6.5 Execution EngineIn this section, we will show how to develop and deploy an execution engine. The intent is to show the process with a simple example rather than building a sophisticated engine. Lets give a different meaning to matrix computation. We re-define the matrix addition, subtraction and multiplication using the following formula. A / B = (A + B) mod N A 0 B = (A - B) mod N A 1 B = (A % B) mod N The "mod" stands for the modulo operation. The result of a mod b is the remainder term, when a is divided by b. The symbols /, 0, 1 are used here only to distinguish otherwise the arithmetic operator symbols remain the same within numEclipse. A good implementation of these operators will take a lot of effort. We will make a quick and dirty implementation just to prove the concept.
We use the "DefaultMatrixImpl" Class which implements the interface "IMatrix" as described in the appendix C. We refactor the class and copy it as "ModuloMatrixImpl" Class. Then we modify the following methods.
Public IMatrix mult(IMatrix m) {...} Public IMatrix plus(IMatrix m) {...} Public IMatrix minus(IMatrix m) {...}
We will not show the code of these methods as the change is extremely simple. We apply the following utility function on each element of the resultant matrix before we return the value.
private IComplex modulo10(IComplex z) {
public IMatrix createMatrix(IComplex[][] c) { The change is very simple, all we did is change the call to the new constructor in the class "ModuloMatrixImpl". Notice that the change is minimal, we did not modify any other data type. We also did not modify the structure of the matrix data type. We only modified the way addition, multiplication and subtraction of two matrices work.
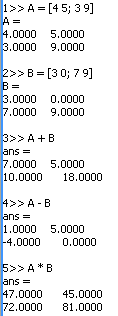
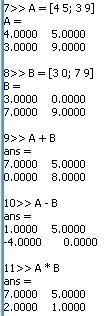
In order to deploy this simple engine, we export these two classes into a jar file (say modulo.jar). Then, add the jar file to the library with numEclipse Preferences. The application will ask you to restart the workspace, allow the application to automatically restart. Right-click anywhere in the interpreter window, a pop-up menu will appear, select the new execution engine. Now you are ready to test the changes. In the following, we show some calculations with default engine and then we show we show the results with new engine.
(default)
(modulo)
Once the new engine is loaded through the preferences, you can switch back and forth from one engine to another just with a click of mouse button. However, there is catch, a variable created with default engine will use the arithmetic operations defined in the default engine. So in other words, just because you switched the engine does not mean that you will be able to apply the new operations with existing variables in the workspace memory. You should clear the memory and create the variables again to use the new operations. In future, we might add a utility to convert the variables as you change the engine. In this section, we showed how to create a simple engine and how to deploy it.
6.6 Future DirectionThe initial intent of this whole business was to come up with a parallel implementation of MATLAB. Then, after looking at the survey of the existing implementations, it was realized that MATLAB cannot be used to achieve our goals. That was the reason, why we built a completely new application parallel to MATLAB. Once, we are satisfied with the performance, robustness and design of the application, our next step will be to build a parallel execution engine.
|
||||||||